Dazzle your guests with this delicious Zesty Turkey Cheese Ball! Fun to make and even more fun to eat, everyone will be ready to GOBBLE, GOBBLE up this tasty hors d’oeuvre in record time before the big feast!
Why We Love It
Every year, Thanksgiving somehow sneaks up on me. Because I typically host these days, it always seems that a day or two before the big day, I start to panic. There are so many things to make and so little time–not to mention that daunting grocery list!

Thankfully, in the midst of my panic last Thanksgiving, my son was such a fantastic helper–especially with the treats and appetizers. He was all on board when he heard I was making Zesty Turkey Cheese Ball, which was so easy and super fun to do together. He really enjoyed helping me and I was grateful because he was able to do all the decorating himself!
That freed me up in the kitchen to make some of my other dishes, like Pickled Red Beet Salad and Cheddar Parmesan Mac and Cheese for the main meal. And guess what?– Zesty Turkey Cheese Ball was not only SUPER delicious, it had my son’s own personal, creative touch. Needless to say, it made a beautiful (and much talked about) centerpiece for our appetizer table!
That was a proud Mama bear and cub moment that has officially started a holiday tradition!
Why You’ll Love It
| Occupies the kids: If you have kids, then you understand that when there’s time off from school, they need to keep busy. What better way to keep them occupied over the long weekend than by spending time together in the kitchen? Only 4 base ingredients: It’s hard to believe that something so tasty can have just 4 ingredients at its core (plus decorative add-ons, which we’ll cover below)! Kitchen creativity: Take our suggestions, or let your (and/or the kids’) creativity shine by dressing up the cheese ball as you wish. You can’t go wrong with a variety of pretzels, nuts, bacon, pepperoni, etc.! Much loved: Zesty Turkey Cheese Ball pairs so well with crackers and veggies and is always the star of the hors d’oeuvre table. Everyone thinks the cheese ball is so adorable and it is always GOBBLED up quickly! |
Looking for more tasty appetizers? Check out our Garlic Ranch Pretzels, Asparagus Canapés, Ham and Swiss Cheese Sliders and Pepperoni Pizza Dip!
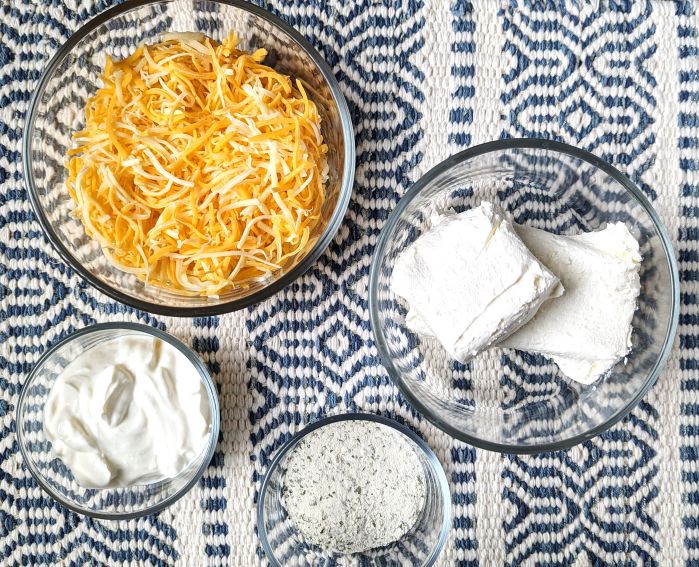
Zesty Turkey Cheese Ball Ingredients
- 12 ounces (1 & 1/2 bricks) of reduced fat cream cheese, softened (Philadelphia brand highly recommended)
- 1/2 cup reduced fat sour cream (Daisy’s or Breakstone’s highly recommended)
- 2-3 tablespoons dry ranch seasoning mix– choose your level of zestiness!
- 1 & 1/2 cups reduced fat shredded Colby Jack cheese (I use Kraft’s 2%)
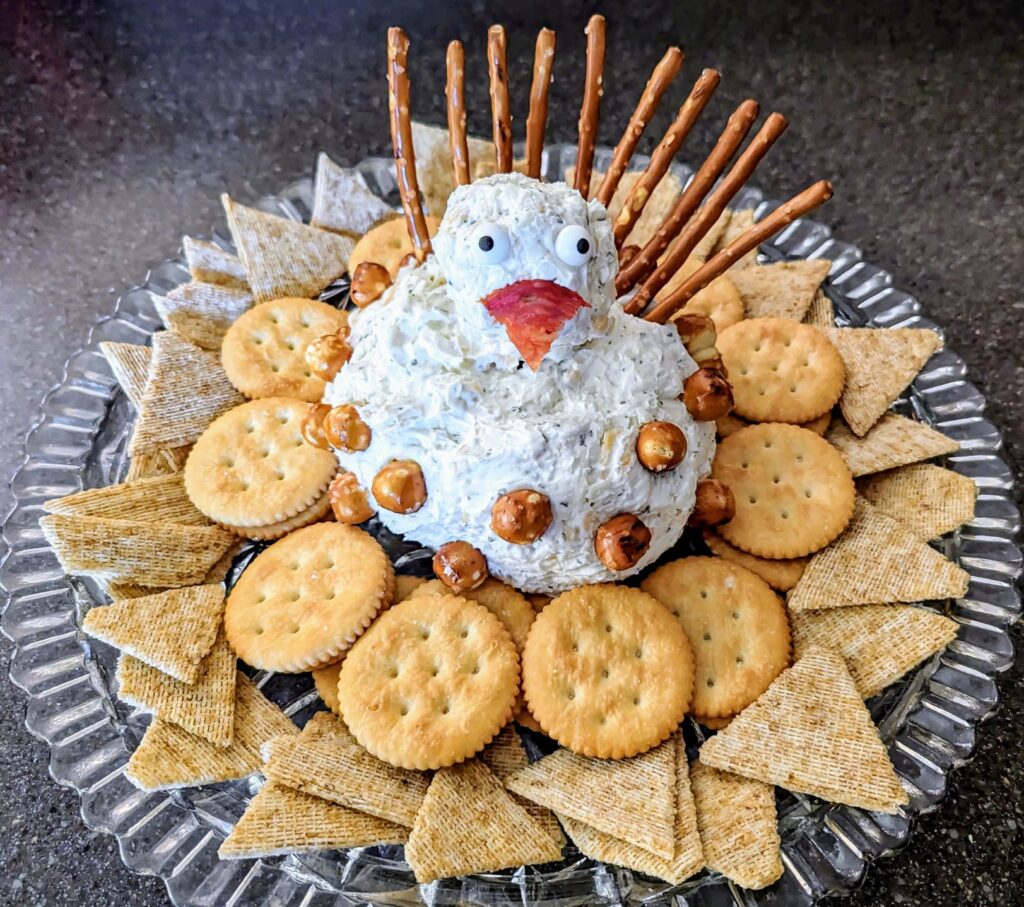
Decorative Add-ons (Listed below is what we use and what you see in the picture. Feel free to change it up!)
- pretzel sticks or thin pretzels
- Snyder’s Pretzel rounds
- candy eyeballs
- sliced pepperoni wedge
Optional/additional extras to cover the cheese ball could include: bacon bits, slivered almonds or crushed walnuts
How to make Zesty Turkey Cheese Ball
You’ll want to gather the following equipment:
- hand mixer
- large mixing bowl
- mixing spoon
- measuring cups
- measuring spoons
- plastic wrap
Getting Started
Kitchen Ready Betty tip: Allow the cream cheese to soften on your counter for easier mixing, or soften in the microwave for 30 seconds..
Make your Zesty Turkey Cheese Ball in just a few simple steps:
Get your hand mixer and large mixing bowl. Place the softened cream cheese and sour cream in the bowl. Set the hand mixer to medium speed and blend until contents are fully incorporated, usually 1-2 minutes.
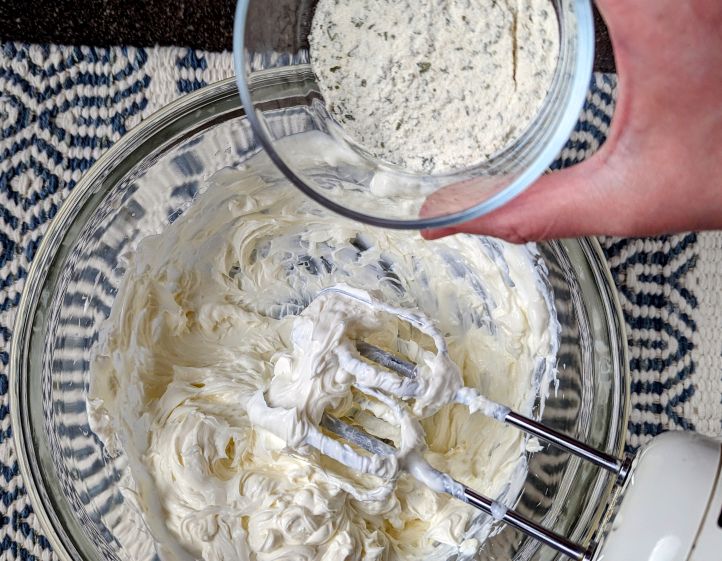
Choose your zest. Big ranch fan? Use 3 tablespoons of the ranch mix. Like it, but not totally gaga over it? Use 2 tablespoons. Place your desired amount in the bowl and blend on low speed until smooth.
Add the shredded cheese to the bowl. Mix on medium speed until well blended, usually 1-2 minutes.
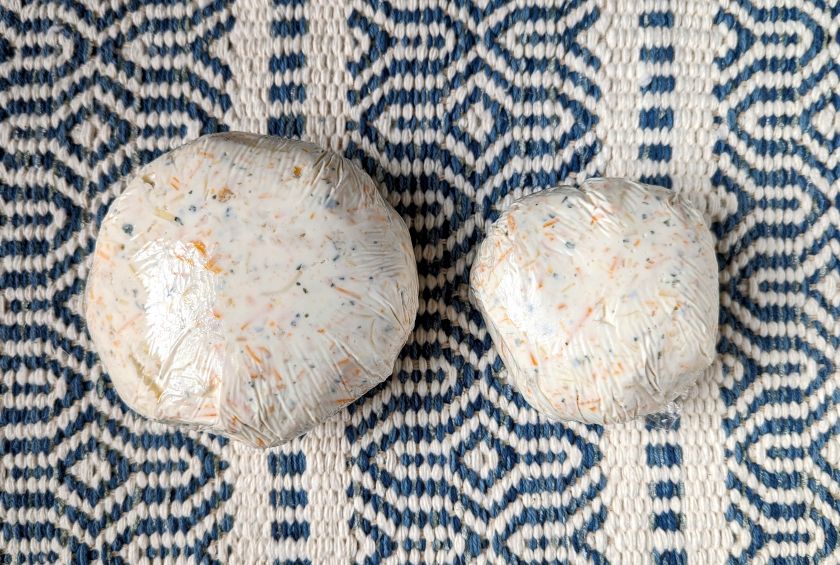
Wrap the cheese balls up like a mummy. Sort of.
Follow these simple steps:
- Place two pieces of plastic wrap on your counter. Put a small portion of the cheese mixture on one piece and the remaining mixture (should be much larger) on the other piece.
- Follow the remaining steps for both cheese balls: Fold the plastic wrap in toward the center, with the goal of getting the corners to meet in the middle.
- Twist the plastic wrap until the cheese mixture is entirely encased in the center.
- Using your hands, form a ball out of the mixture (luckily, this part isn’t messy because your hands are on the outside of the plastic wrap).
- Continue to mold until you have a decent looking sphere.
Watch my Instagram video here! -0r- Watch it on my YouTube channel here!
Chill for at least 4 hours-but I recommend 24 hours for optimal shaping.
When ready to assemble, have your serving tray or platter for the cheese ball ready to go. Choose a serving tray with additional room so you can add crackers, other cheeses, pepperoni and veggies of varying colors!

You can’t go wrong with a variety of these options. Anything that goes well with ranch and cream cheese will go well with Zesty Turkey Cheese Ball!
Zesty Turkey Cheese Ball Assembly
| Unwrap the cheese balls: Place the larger one on a little plate first; then stack the smaller one on top. Feathers: Put several pretzel sticks or thin pretzels in the back of the large cheese ball. Point them upwards to resemble feathers. Belly: Gently push pretzel rounds around the entire belly. Face: Add the candy eyes and pepperoni wedge (beak) to the small cheese ball. |
For additional flavoring, decorate the outside of the cheese ball further as desired. You may consider pushing bacon bits, slivered almonds and/or crushed walnuts onto the outside for added aesthetic appeal.
Enjoy! Zesty Turkey Cheese Ball will be the talk of your party. It’s just that good! Are you ready to gobble him up?

Zesty Turkey Cheese Ball Leftovers?
Store in an airtight container and refrigerate. Enjoy within 3-5 days. (It’s best to remove decorative items before storing because they will get soggy.)
For another fun treat to make with the kids, check out our super easy Bumps on a Log!
Zesty Turkey Cheese Ball
Description
This 4 ingredient, delicious Zesty Turkey Cheese Ball is easy to make and easy to devour! It pairs so well with crackers and veggies and is always the star of the Thanksgiving hors d'oeuvre table. Plus, Zesty Turkey Cheese Ball is easily customizable. The kids will enjoy making it with you!
Zesty Turkey Cheese Ball
Cheese Ball Base Ingredients:
Decorative Add-ons: (This is what you see in the picture. Feel free to change it up!)
Instructions
How to Make Zesty Turkey Cheese Ball:
-
Allow cream cheese to soften on counter prior to starting for easier mixing (or microwave for 30 seconds in bowl).
-
Place the softened cream cheese and sour cream in large mixing bowl. Set the hand mixer to medium speed and blend until contents are fully incorporated, usually 1-2 minutes.
-
Add desired amount (2-3T.) of ranch mix to bowl and blend on low speed until smooth.
The more ranch mix you use, the zestier your cheese ball will be! -
Add the shredded cheese to the bowl. Mix on medium speed until well blended, usually 1-2 minutes.
Cheese Ball Encasing Instructions:
-
Place two pieces of plastic wrap on your counter. Place a small portion of the mixture on one piece and the remaining mixture (should be much larger) on the other piece.
-
Do steps 6-9 for BOTH cheese balls: Fold the plastic wrap in toward the center, with the goal of getting the corners to meet in the middle.
-
Twist the plastic wrap so that the cheese ball is entriely encased in the center.
-
Using your hands, form a ball out of the mixture. Continue to mold until you have a decent looking sphere.
-
Refrigerate for a minimum of 4 hours, though 24 is recommended for optimal shaping.
-
Zesty Turkey Cheese Ball Assembly:
Unwrap the cheese balls: Place the larger one on a little plate first; then stack the smaller one on top.
Feathers: Put several pretzel sticks or thin pretzels in the back of the large cheese ball. Point them upwards to resemble feathers.
Belly: Gently push pretzel rounds around the entire belly.
Face: Add the candy eyes and pepperoni wedge (beak) to the small cheese ball.
You may choose to also add bacon bits, slivered almonds and/or crushed walnuts on the outside of the cheese ball before serving.
Leftovers?
-
Rechill.
Store in an airtight container and refrigerate for 3-5 days. Do not freeze.
Before storing, remove any decorative parts (such as candy eyes or pretzels) in order to prevent sogginess.
Note
Zesty Turkey Cheese Ball is delicious when enjoyed with anything that pairs well with ranch and cream cheese!
I always use Philadelphia brand reduced fat cream cheese for this recipe, but it's okay if you prefer to use the full fat version.
This cheese ball is open to your customization. Have fun with it and feel free to be creative with your design!
